Managing tasks effectively is essential for any sales team to stay organized and on top of their leads, follow-ups, and deals. In GoDial CRM, creating and assigning tasks helps sales teams streamline their workflow and ensure that no important actions fall through the cracks. With tasks, you can set reminders for calls, follow-ups, meetings, or any other activity necessary to move your leads through the sales pipeline.
In this article, we’ll walk through the step-by-step process of how to create tasks in GoDial and how they can be leveraged to improve sales performance.
What is a Task in GoDial CRM?
A task in GoDial CRM represents any activity or action that needs to be completed by a sales rep, such as making a phone call, sending an email, scheduling a meeting, or following up with a lead. Tasks can be assigned to team members, prioritized, and linked to specific contacts or leads, ensuring that every necessary action is documented and tracked.
Why Creating Tasks is Important:
Tasks play a key role in ensuring that your sales team:
- Follows up consistently with leads, which improves conversion rates.
- Keeps track of deadlines for calls, meetings, or proposals.
- Maintains focus on high-priority deals.
- Collaborates more effectively, as tasks can be assigned to different team members and tracked for completion.
By using tasks, GoDial helps sales teams stay on top of their to-do lists and keeps the pipeline moving efficiently.
Step-by-Step Guide: How to Create Tasks in GoDial
Creating tasks in GoDial is a simple and intuitive process. Follow these steps to create and manage tasks for yourself or your team:
1. Login to Your GoDial CRM Account
- First, log in to your GoDial CRM account using your credentials. This will take you to the dashboard where you can access all the features of the platform.
2. Navigate to the Tasks Section
- In the dashboard, there should be a dedicated Tasks or Task Management section. You can usually find this in the sidebar or under the contacts or leads section. Depending on your CRM setup, the tasks might also be linked directly to the contact details page.
3. Select the Contact or Lead
- Before creating a task, it’s important to link it to the relevant contact or lead. You can navigate to the specific lead or contact page where you want to assign the task. This ensures that the task is properly associated with the person or deal you’re working on.
Example:
- If you are working with a lead named John Doe, navigate to John Doe’s contact page. You can then create a task specific to him, such as a follow-up call or sending an email.
4. Click on the “Add Task” Button
- On the contact or lead’s page, there should be an option to create or add a task. Look for a button labeled “Add Task” or similar, usually located near the interaction details, timeline, or action menu.
Example button text:
- + Create Task
- Add New Task

5. Fill in Task Details
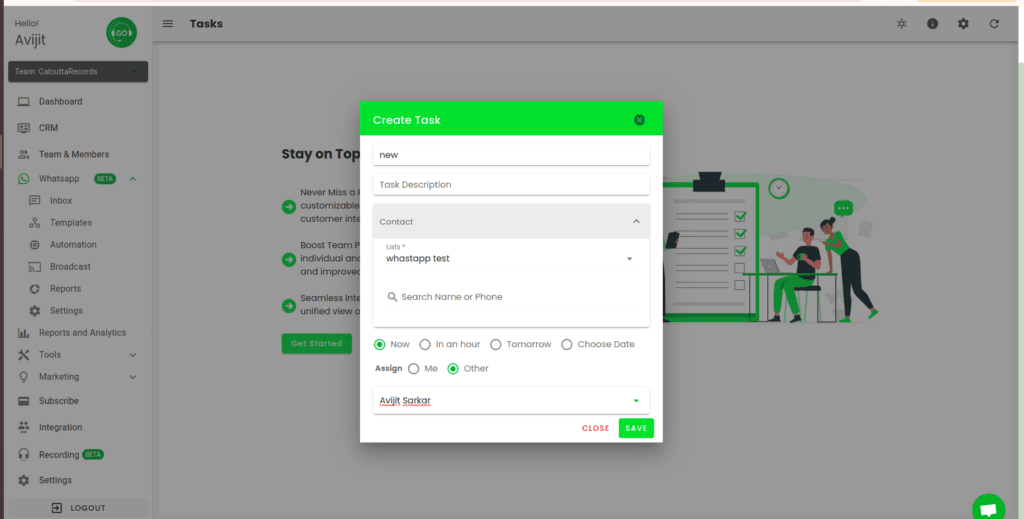
Once you click on “Add Task”, a task creation form will appear. Fill in the following details for the task:
- Task Title: A brief, descriptive title of what the task is. For example, “Call John Doe for follow-up” or “Send proposal to ACME Corp”.
- Description/Notes: A detailed description of the task, if needed. Here you can specify additional information about the task, such as the main points to cover in a follow-up call or the steps needed to complete the task.
- Due Date and Time: Set a deadline for the task. You can specify the exact date and time the task needs to be completed. This is particularly useful for time-sensitive follow-ups or meetings.
- Priority: Some tasks are more urgent than others. GoDial might offer priority levels such as High, Medium, or Low. Assign a priority level to indicate the importance of the task.
- Assign to: If you’re a team leader or manager, you can assign tasks to specific members of your team. Select the appropriate team member from the list to assign them the task.
- Reminder: GoDial may offer a feature to set up a reminder for the task. This will notify the assigned person or team members before the task is due, ensuring that nothing gets missed.
6. Save the Task
- After filling out all the necessary information, click the “Save” or “Create Task” button to confirm the creation of the task. The task will now be added to the task list and associated with the specific contact or lead.
7. View and Manage Tasks
- Once tasks are created, you can view all upcoming or pending tasks in the Tasks Dashboard. This dashboard will list all tasks by due date, priority, and assigned person. You can sort, filter, and search tasks to stay organized.
- On the contact or lead’s individual page, you will also be able to see all tasks associated with that contact.
8. Complete or Mark Tasks as Done
- When a task is completed, navigate to the task and mark it as completed or done. This helps in tracking progress and keeping the pipeline clean.
- GoDial may provide a checkbox or a button labeled “Mark as Completed” or “Done” next to the task. Once you’ve finished the task, simply click it to indicate completion.
Conclusion
Creating and managing tasks in GoDial CRM is a straightforward process that can significantly improve the efficiency of your sales workflow. By using the task management features, sales teams can stay organized, prioritize important activities, and ensure timely follow-ups that lead to higher conversion rates.
Tasks can be linked directly to contacts and leads, helping sales reps stay on top of all necessary actions, from making calls to closing deals. By effectively using tasks, GoDial can help your sales team move leads through the pipeline more efficiently and ultimately close more deals.
With GoDial’s task management tools, you can ensure that your sales process runs smoothly and that your team stays productive and focused on what matters most—winning customers.


